Bulk load into Amazon Redshift

The Bulk load into Amazon Redshift entry leverages Amazon Redshift's COPY command for greater automation while populating your Amazon Redshift cluster with your PDI data, eliminating the need for repetitive SQL scripting. By using the Redshift COPY command, this entry can take advantage of parallel loading and cloud storage for high performance processing.
Before you begin
Before using the Bulk load into Amazon Redshift entry in PDI, you must perform the following steps to download the Redshift driver and copy into the Pentaho distribution:
Procedure
Download the latest JDBC 4.0 driver from the Download the Amazon Redshift JDBC Driver site.
Copy the downloaded JAR file into the server/pentaho-server/tomcat/lib directory to update the Pentaho Server.
Copy the downloaded JAR file into the design-tools/data-integration/lib directory to update PDI.
Verify that your cluster is configured to support the COPY command.
See Credentials and Access Permissions for more details.
Results
General
The following field is general to this job entry:
- Entry Name: Specify the unique name of the job entry on the canvas. You can customize the name or leave it as the default.
Options
The Bulk load into Amazon Redshift entry includes several tabs to define the data input source, the output database and location, and other Redshift COPY command parameters for loading PDI data into Amazon Redshift. Each tab is described below.
Input tab
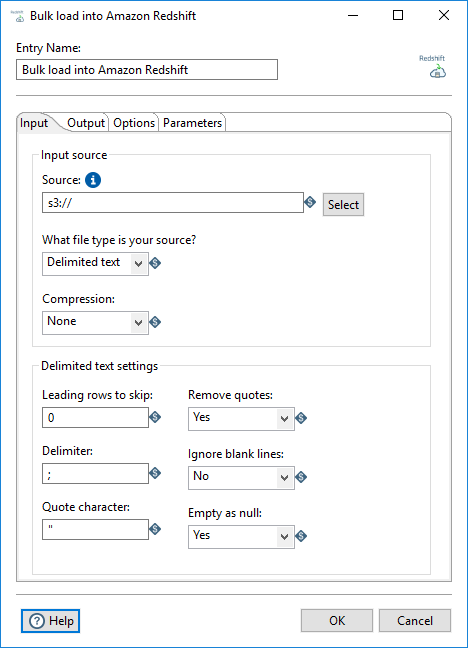
Use the options in this tab to define your input source for the Redshift COPY command:
| Option | Description |
| Source | Specify the file, folder, prefix, or variable of the S3 bucket to use as the input for the Redshift COPY command. See Syntax of the COPY from Amazon S3 for more details on how to specify this option. |
| What file type is your source | Select the file type of the input source. You can select one of the
following types:
|
| Compression | Select the type of compression applied to your input source:
|
Depending on what file type you selected for What file type is your source, the following file settings appear at the bottom of this tab:
| File Type | File Settings |
| Delimited text | Specify the following settings for a delimited text file:
|
| Avro | Select one of the following values for the Empty as
null option to indicate whether empty data values should be set to
null during the bulk load:
|
| JSON | Select one of the following values for the Empty as
null option to indicate whether empty data values should be set to
null during the bulk load:
|
| ORC | Additional file settings handled by the ORC file. |
| Parquet | Additional file settings handled by Parquet file. |
| Fixed width | Specify the following settings for a fixed width file:
|
Output tab

Use the options in this tab to define how the data is loaded using the Redshift COPY command:
| Option | Description |
| Database connection | Select your database connection from a list of existing Redshift
connections. If you do not have an existing connection, click New. If you need to modify an existing connection, click Edit. The Database Connection dialog box appears. An exclamation mark appears in the title of theOutput tab if a connection cannot be established to the selected database. In this case, click Edit to modify your connection settings. You must specify your IAM-role based access or credentials in your database connection for Redshift. Within the Database Connection dialog box, select either Role or Credentials. For your S3 role, specify the IAM-role in Role Name. For your S3 credentials, specify the Access Key ID and Secret Access Key. |
| Schema | Select the schema to use for the bulk load. |
| Table name | Select the name of the table to bulk load. You can only load one table at a time. You will need to use multiple Bulk load into Amazon Redshift entries or loop over a single entry to load multiple tables. |
| Columns | Preview columns within your selected Table name. |
Options tab

Use the option in this tab to define how tabular data is loaded using the Redshift
COPY command:
| Option | Description |
| Truncate table | Select to remove all the data in the table before bulk loading the current data. When the Truncate table option is cleared, the data is appended during a new data load. The default is cleared. |
Parameters tab
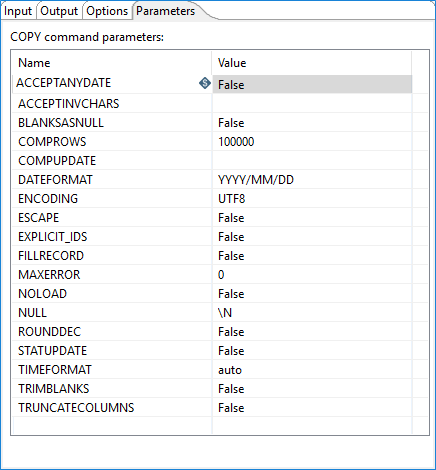
Use this tab to configure additional parameters for the Redshift COPY command. See Redshift's COPY Parameter Reference for further details on these parameters.