Output parameterization

You can create reports with parameters that the report reader can adjust, which is easier than creating multiple reports with the same basic layout and similar data. Simple parameterization involves changing data values. For example, report readers might want to filter data by product. You can provide report readers with the option to filter by the values in a drop-down list. In this case, you would parameterize the column that contains product names, so report readers can change for which product they want to see data.
While simple parameters are added after the data structure has been defined through a query, advanced parameters give readers the power to change the data structure itself. For example, you might offer an option to select among multiple columns in a given table. These parameters must be expressed as formulas and are executed with the query.
Simple SQL output parameterization
Perform the following steps to parameterize a report by adding an SQL WHERE statement to your query.
Procedure
Open the report you want to parameterize.
Click the Data tab in the upper right pane.
Right-click the Parameters item in the Data pane, then select Add Parameter from the context menu.
The Add Parameter dialog box appears.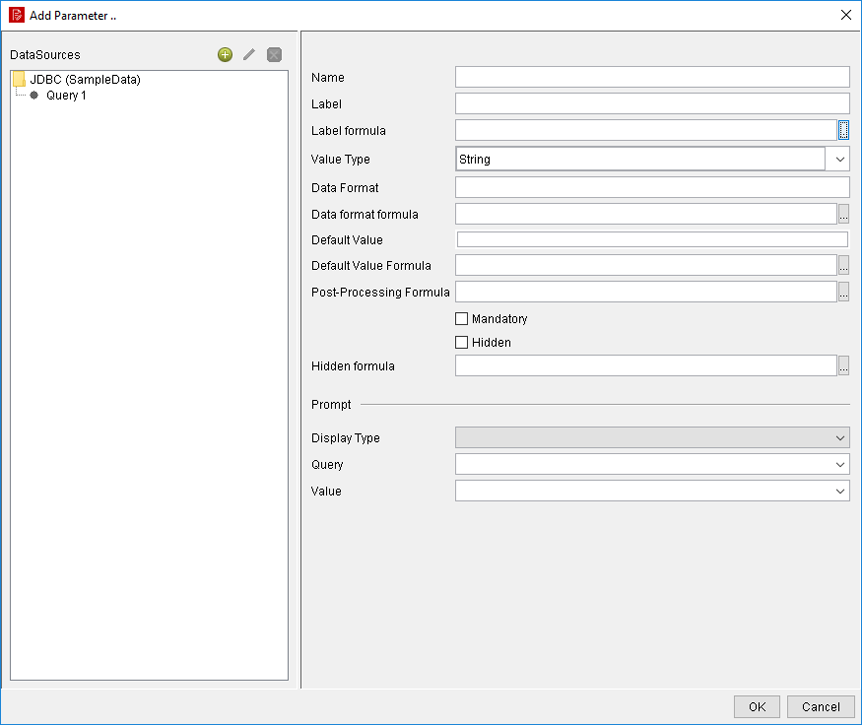
The table below describes each of the options for configuring the parameters:
Field Purpose Name The name of the parameter in Report Designer. Label The label of the parameter that is shown to report readers. Label formula A formula that dynamically changes the name of the parameter on the report. Value Type The data type of the column you selected in the Value field. Data Format Determines how the data specified by the Value Type is formatted. This field is especially useful when formatting dates and timestamps. Data Format formula A formula that dynamically changes the value of the Data Format. Default Value The default value for the parameter. For a parameter with multiple values, the values are specified as arrays. Default Value Formula A formula that dynamically changes the Default Value or values. Post-Processing Formula A formula that updates a selected parameter. This formula is executed when a parameter is submitted, and can be used to validate parameter input. For example, you can change all text to be upper case. Mandatory Specifies whether this parameter is required to display any data in the report. Hidden Specifies whether to hide the parameter from displaying when the value is already passed in a session variable. This option can be used in combination with the Post-Processing Formula option to create a calculated parameter. Hidden formula A formula to hide a parameter when the formula evaluates to TRUE. If left blank, the selected parameter is hidden when the Hidden check box is selected. Display Type The parameter type. Query A list of queries that you have already defined. Use the toolbar above the left pane to define a new query. Value Field in the data source that is substituted in the query. Display Value Formula A formula that changes the contents inside the list or drop-down menu in the report. Edit your target data source by double-clicking its entry in the Structure pane.
Below your FROM statement, add a WHERE statement that specifies which column you would like to query the user about. Assign it to a parameter that has a name descriptive enough for users to understand.
This column should be one of the columns you have a SELECT statement for in the same query.Click OK to save the query.
Include the parameterized fields in your report by dragging them onto the canvas.
Publish or preview your report.
Results
PRODUCTLINE column of the
PRODUCTS
table.SELECT
PRODUCTLINE,
PRODUCTVENDOR,
PRODUCTCODE,
PRODUCTNAME,
PRODUCTSCALE,
PRODUCTDESCRIPTION,
QUANTITYINSTOCK,
BUYPRICE,
MSRP
FROM
PRODUCTS
WHERE PRODUCTLINE = ${ENTER_PRODUCTLINE}
ORDER BY
PRODUCTLINE ASC,
PRODUCTVENDOR ASC,
PRODUCTCODE ASCAdvanced SQL output parameterization
This procedure requires a JDBC (Custom) data source type. You must establish this data source before continuing with the instructions below. You do not need to construct a query yet.
Perform the following steps to parameterize a report by creating a custom formula.
Procedure
Open the report you want to parameterize.
Right-click the Parameters item in the Data pane, then select Add Parameter from the context menu.
The Add Parameter dialog box appears.Select or change the options according to the definitions specified in Simple SQL Output Parameterization.
Go to the Structure pane, then select Master Report.
In the Attributes pane, click the round green Plus Sign (+) in the name field of the Query section.
The Expression window appears.Click the Ellipses button .
The Formula Editor appears.In the Formula field, use a SELECT DISTINCT statement to parameterize the data structure with your previously defined parameter, as shown in the example below.
="SELECT DISTINCT " & [paramexample] & " AS COL1 FROM PRODUCTS"
The paramexample is a placeholder for the name of the parameter you created earlier.COL1is the example name of the element to be parameterized in your report, andPRODUCTSis an example table name in your database.NoteThe spaces afterDISTINCTand beforeASare important. Do not omit them.Click OK when you are done with the query, then click Close in the Expression window.
Add a field of the applicable data type to your report, and name it according to the
In the example above, the name of the text field would beASstatement you defined in your query.COL1.Publish or preview the report.
Results
Simple metadata output parameterization
This procedure requires a metadata data source type. You must stablish this data source and a query before continuing with the instructions below.
Perform the following steps to parameterize a metadata-based report.
Procedure
Open the report you want to parameterize.
Right-click the Parameters item in the Data pane, then select Add Parameter from the context menu.
The Add Parameter dialog box appears.Select or change the options according to the definitions specified in Simple SQL Output Parameterization.
Edit your query and add the columns you want to parameterize to the Conditions field.
Create a parameter token in the Value field of each row in the Conditions area, and a valid default value in the Default field.
Parameter tokens are in braces {} and do not contain spaces.Click OK to save the query.
Include the parameterized fields in your report by moving them onto the canvas.
Publish or preview the report.
Results
Simple OLAP output parameterization
This procedure requires a Pentaho Analysis (Mondrian) data source type. You must stablish this data source and a query before continuing with the instructions below.
Perform the following steps to parameterize an OLAP-based report.
Procedure
Open the report you want to parameterize.
Right-click the Parameters item in the Data pane, then select Add Parameter from the context menu.
The Add Parameter dialog box appears.Select or change the options according to the definitions specified in Simple SQL Output Parameterization.
Edit your MDX query and add parameter functions and a WHERE statement, as in the example below.
with
  set [TopSelection] as
  'TopCount(FILTER([Customers].[All Customers].Children,[Measures].[Sales]>0), Parameter("TopCount", NUMERIC, 10, "Number of Customers to show"), [Measures].[Sales])'
  Member [Customers].[All Customers].[Total] as 'Sum([TopSelection])'
  Member [Customers].[All Customers].[Other Customers] as '[Customers].[All Customers] - [Customers].[Total]'
select NON EMPTY {[Measures].[Sales],[Measures].[Quantity] } ON COLUMNS,
  { [TopSelection], [Customers].[All Customers].[Other Customers]} ON ROWS
from [SteelWheelsSales]
where
(
strToMember(Parameter("sLine", STRING, "[Product].[All Products].[Classic Cars]")),
strToMember(Parameter("sMarket", STRING, "[Markets].[All Markets].[Japan]")),
strToMember(Parameter("sYear", STRING, "[Time].[All Years].[2003]"))
)
Click OK to save the query.
NoteEach parameter must have its own query or data table.Include the parameterized fields in your report by moving them onto the canvas.
Publish or preview the report.
Results