Define data connections

PUC (Pentaho User Console) and PDI (Pentaho Data Integration) can access data from various sources. If your data source is a database, you must connect to the database before accessing its records. You define database connections in PUC and PDI through the Database Connection dialog box.
Before you can create a connection, the appropriate driver must be installed for your particular data connection. Your IT administrator should be able to install the appropriate driver for you.
Open the connection dialog box
You can access the Database Connection dialog box from either PUC or PDI.
Open the Database Connection dialog box from PUC
Procedure
Log on to PUC, then click on
The Manage Data Sources dialog box appears.Select New Connection in the More actions and options menu.
The Database Connection dialog box appears, as shown below: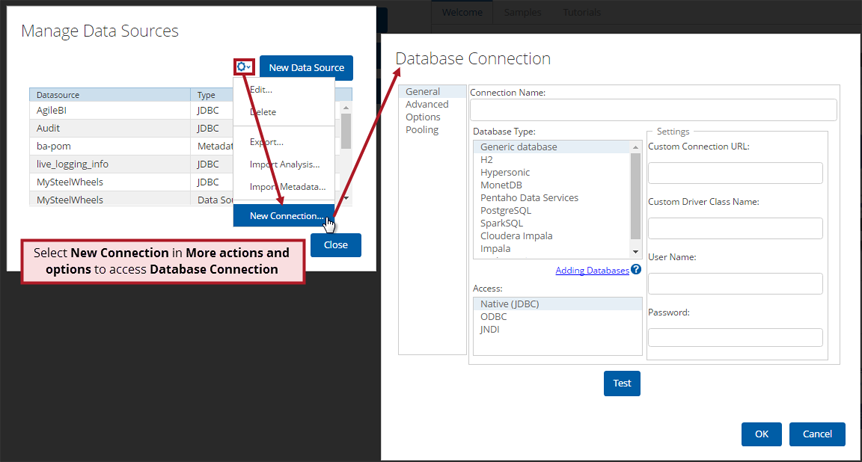
Enter your data connection information and test.
See Enter database connection information for further details.
Open the Database Connection dialog box from PDI
Procedure
Start the PDI client (Spoon) and create a new transformation or job.
In the View tab of the Explorer pane, double-click on the Database connections folder.
The Database Connection dialog box appears, as shown below: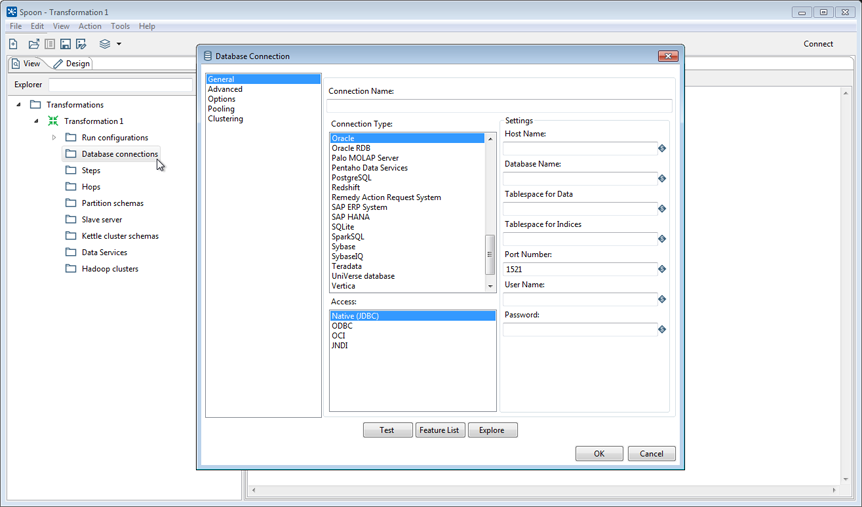
Enter your data connection information and test.
See Enter database connection information for further details.
Next steps
Pentaho recommends avoiding ODBC connections. The ODBC to JDBC bridge driver does not always provide an exact match and adds another level of complexity, which affects performance. The only time you may have to use ODBC is if no JDBC driver is available. For details, see the Pentaho Community article on why you should avoid ODBC.
When you define a database connection in PDI, the connection information (such as the user name, password, and port number) is stored in the Pentaho Repository and is available to other users when they connect to the repository. If you are not using the Pentaho Repository, the database connection information is stored in the XML file associated with your transformation or job.
You must have information about your database (such as your database type, port number, user name and password) before you define a JDBC connection. In PDI, you can also set connection properties as variables. Through such variables, your transformations and jobs can access data from multiple database types.
Make sure to use clean ANSI SQL that works on all the database types used.
Enter database connection information
The type of database connection information entered depends on your access protocol. The following sections show examples for Native (JDBC) and OCI protocols:
Native (JDBC) protocol information
Procedure
In the Connection Name field, enter a name that uniquely describes this connection.
The name can have spaces, but it cannot have special characters (such as #, $, and %).In the Database Type list, select the database you want to use (for example, MySQL or Oracle).
In the Access list, select Native (JDBC). The access protocol which appears depends on the database type you select.
In the Settings section, enter the following information:
Field Description Host Name The name of the server that hosts the database to which you are connecting. Alternatively, you can specify the host by IP address. Database Name The name of the database to which you are connecting. If you are using a ODBC connection, enter the Data Source Name (DSN) in this field. Port Number The TCP/IP port number (if it is different from the default) User Name Optional user name used to connect to the database Password Optional password used to connect to the database Click Test.
A success message appears if the connection is established.Click OK to close the connection test dialog box.
To save the connection, click OK to close the Database Connection dialog box.
- In PUC, your connection name appears in the list of available data sources in the Manage Data Sources dialog box.
- In PDI, your connection name appears under the Database connections folder in the View tab.
OCI protocol information (PDI only)
Procedure
In the Connection Name field, enter a name that uniquely describes this connection.
The name can have spaces, but it cannot have special characters (such as #, $, and %).In the Database Type list, select Oracle.
In the Access list, select OCI. The access protocol which appears depends on the database type you select.
In the Settings section, enter the following information as directed by the Oracle OCI documentation.
Field Description SID The Oracle system ID that uniquely identifies the database on the system Tablespace for Data The name of the tablespace where the data is stored Tablespace for Indices The name of the tablespace where the indices is stored User Name The user name used to connect to the database Password The password used to connect to the database Click Test.
A success message appears if the connection is established.Click OK to close the connection test dialog box.
To save the connection, click OK to close the Database Connection dialog box.
Next steps
Edit existing connections
Once a connection has been established, you can open the Database Connection dialog box to refine and change aspects of the connection.
Edit database connections in PUC
Procedure
Click .
The Manage Data Sources dialog box appears.Highlight the name of the data source you want to edit and select Edit in the More actions and options menu.
The Database Connection dialog box appears with General highlighted in the left navigation pane.Select items in the left navigation pane to further refine your connection or to enable/disable connection options.
Edit database connections in PDI
Procedure
With a transformation or job open in the PDI client canvas, expand the Database connections folder in the View tab of the Explorer pane
Right-click on a connection name and select Edit. The Database Connection dialog box appears with General highlighted in the left navigation pane.
Select items in the left navigation pane to further refine your connection or to enable/disable connection options.
Specify advanced configuration of database connections
Procedure
Click Advanced on the left pane.
The available options depend on whether you are using PUC or PDI as shown below: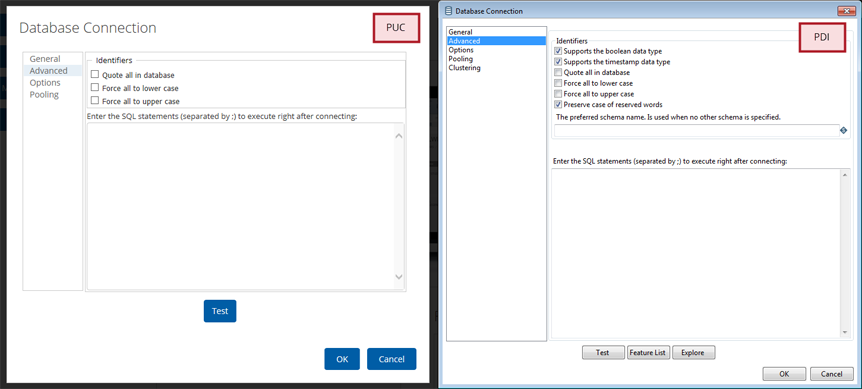
Check the appropriate boxes and enter the SQL statements as described in the following table:
Identifier Description Supports the Boolean data type* Instructs PDI to use native Boolean data types supported by the database. Supports the timestamp data type* Instructs PDI to use the timestamp data type supported by the database. Quote all in database Enables case-sensitive table names. For example, MySQL is case-sensitive on Linux, but not case-sensitive on Microsoft Windows. If you quote the identifiers, the databases uses a case-sensitive table name. Force all to lower-case Enables the system to change the case of all database to lower-case. Force all to upper-case Enables the system to change the case of all identifiers to upper-case. Preserve case of reserved words* Instructs PDI to use a list of reserved words supported by the database. Preferred schema name* For PDI, enter the preferred schema name (for example, MYSCHEMA). SQL statements Enter the SQL statement used to initialize this connection. NoteWhich preferences appear depends on if you are accessing the dialog box from PUC or PDI. The additional fields available in PDI are indicated with an asterisk (*).Click Test. A success message appears if the connection is established. Click OK to close the connection test dialog box.
To save the connection, click OK to close the Database Connection dialog box.
Quoting
Pentaho uses a database-specific quoting system. With this system, you can use any name or character that complies with the supported databases' naming conventions.
Both PUC and PDI contain a list of reserved words for most of the supported databases. Pentaho maintains a strict separation between the schema (the user or owner of a table) and the table name itself to correctly quote table or field names that contain one or more periods in them. Placing periods in table and field names is common practice in some ERP systems (for example, fields such as V.A.T.)
To avoid quoting-related errors, a rule stops the Pentaho software from performing quoting activity when there is a start or end quotation mark in the table or schema name. This allows you to specify the quoting mechanism yourself.
Set database-specific options
Procedure
Click Options in the left pane.
The Parameters table appears as shown as shown below: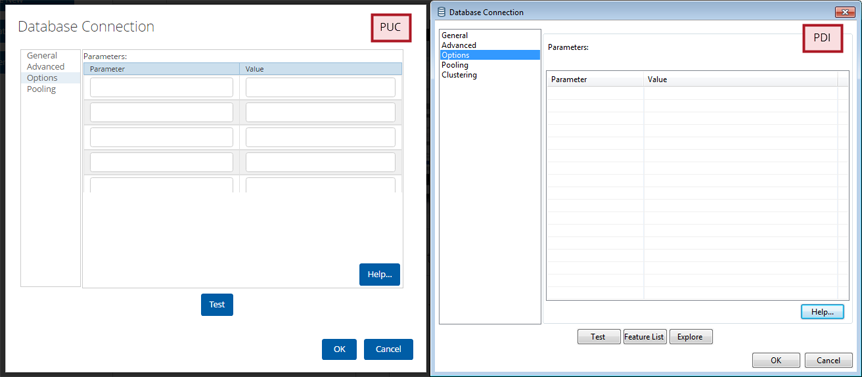
In the next available row of the Parameters table, enter a valid parameter name and its corresponding value. For JDBC database-specific configuration help, click Help.
A new browser window opens and displays additional information about configuring the JDBC connection for the database type that is currently selected in the General pane.Click Test.
A success message appears if the connection is established.Click OK to close the connection test dialog box.
To save the connection, click OK to close the Database Connection dialog box.
Define connection pooling
Perform the following steps to specify pooling options:
Procedure
Click Pooling in the left pane.
Options appear for your JDBC driver as shown in the example below: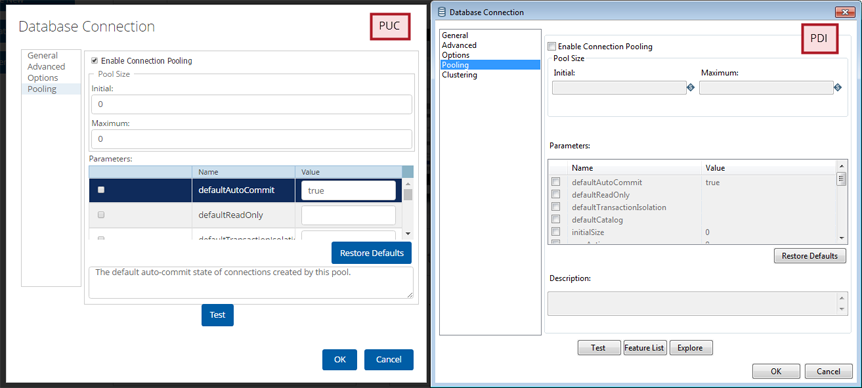 The following table shows an example of Pooling
options that might be available in a typical JDBC driver. Check your driver
documentation for driver-specific pooling details.
The following table shows an example of Pooling
options that might be available in a typical JDBC driver. Check your driver
documentation for driver-specific pooling details.Option Description Enable Connection Pooling Enables connection pooling. Pool Size Initial
Set the initial size of the connection pool.
Maximum
Set the maximum number of connections in the connection pool.
Parameters You can define additional custom pool parameters. Click on any parameter to view a short description of that parameter. Click Restore Defaults when to restore the default values for selected parameters.
The most commonly-used parameter is validationQuery. The parameter differs slightly depending on your RDBMS connection. The basic set of Pentaho databases use the following values for validationQuery:
- For Oracle and PostgreSQL, use Select 1 from dual.
- For MS SQL Server and MySQL, use Select 1.
Description Enter a description for your parameters. Click Test.
A success message appears if the connection is established.Click OK to close the connection test dialog box.
To save the connection, click OK to close the Database Connection dialog box.
Connect to clusters (PDI only)
Use the Clustering options in the Database Connection dialog box to cluster the database connection and create connections to data partitions in PDI. To create a new connection to a data partition, enter a Partition ID, the Host Name, the Port, the Database Name, User Name, and Password for the connection.
If you have the Pentaho Server configured in a cluster of servers, and use the Data Source Wizard(DSW) in PUC to add a new data source, the new data source will only be seen on the cluster node where the user has a session. For the new data source to be seen by all the cluster nodes, you must disable DSW data source caching. This may cause the loading of the data source list to be slower since the list is not cached.
To disable the cache, navigate to the server/pentaho-server/pentaho-solutions/system folder and set the enableDomainIdCache value in the system.properties file to false.
Modify connections
You can perform other various database-related connection tasks from either PUC or PDI.
Modify connections from PUC
Access other database-related connection tasks in PUC through the More actions and options menu in the Manage Data Sources dialog box, as shown below:
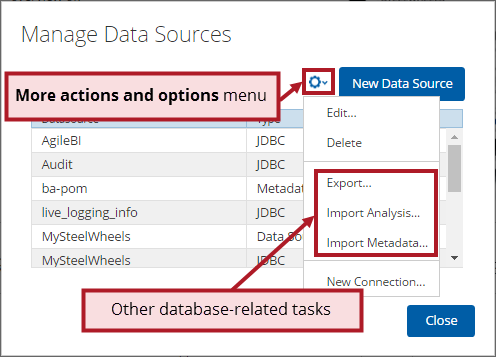
The following table describes these tasks:
| Task | Description |
| Export | Export database connection information to an XML file. |
| Import Analysis | Import data values from a Mondrian file into a data source. |
| Import Metadata | Import data values from an XMI metadata file into a data source. |
Modify connections from PDI
Access other database-related connection tasks in PDI by right-clicking on the connection name in the View tab of the Explorer pane, as shown below:
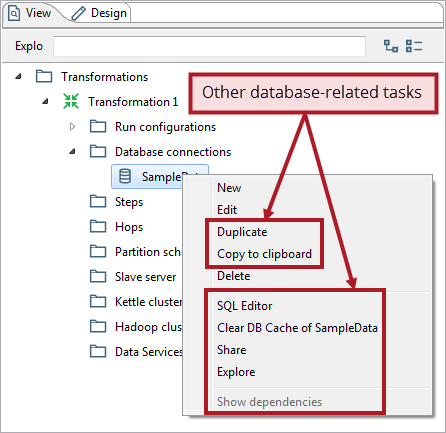
The following table describes these tasks:
| Task | Description |
| Duplicate | Duplicate the database connection. The duplicate will not be created unless you specify a different Connection Name in the Database Connection dialog box when it appears. |
| Copy to clipboard | Copy the XML defining the step to the clipboard. |
| SQL Editor | Execute SQL commands against an existing connection within the SQL Editor. |
| Clear DB Cache | Clear out the database cache used by PDI to speed up connections. This command is commonly used when databases tables have been changed, created, or deleted (when the information in the cache no longer represents the layout of the database). |
| Share | Share the connection information among transformations and jobs. |
| Explore | Use the Database Explorer to explore the schemas and tables of your connected database. |
| Show dependences | Show all of the transformations and jobs that use this database connection. |
Delete connections
If you no longer need a connection, you can delete it.
Delete connections from PUC
Perform the following steps to delete a connection in PUC:
Procedure
Click .
The Manage Data Sources dialog box appears.Highlight the name of the data source you want to delete and select Delete in the More actions and options menu.
The data source no longer appears in the list of data sources.
Delete connections from PDI
Procedure
Expand the Database connections folder in the View tab of the Explorer pane.
Right-click on a connection name and select Delete.
The data source no longer appears under the Database connections folder.